Automate network topologies with CML, Ansible & Docker.
Intro
After many hours of reading Ansible books, looking at codes and testing, I’m continuing with the network project I started on my previous article.
On this post you will find how to create day-0 network topologies from scratch using Cisco Modelling Labs, Ansible and Docker.
Why Cisco Modelling Labs (CML)?, first and foremost, it is free (just reserve a lab). It comes with a default selection of Cisco images and won’t put a strain on your local machine’s resources. There is no need for installation or configuration. Furthermore, it is not limited to Cisco devices alone.
Prerequisites
To create the content of this post, you need:
- CML instance, either personal or from Devnet sandbox.
- If you don’t have a CML instance:
- Reserve a lab in the Cisco Devnet Sandbox. Is free.
- Cisco Anyconnect in your laptop. You need the VPN client to reach the network where the devices are reachable.
- A mail will be sent with the details to connect or click in “output” in the sandbox page.
- Docker on the client machine.
- Git, to clone the repo.
TL;DR
To get your lab, just do.
- Clone the release v1.0.0 from Github.
- See below if you are not sure which command use to clone an specifc tag.
- The code in github is a living project, the main branch could have a different code than the one presented on the post, therefore all links presented in this article point to release
v1.0.0
- Start the container from the root directory of the project.
docker-compose -f ./docker/cml.docker-compose.yml up -d
- Create the lab from inside the container.
ansible-playbook cisco.cml.build -e startup='host'
With that, you will be ready to go and have a lab in CML. If you want to understand how this works, keep reading.
Why?
As I’m experimenting network automation, I need a baseline to start, this post automates this baseline so I can focus on trying new ideas. The lab created, contains the day-0 config to start.

The benefits of using Docker, Ansible and CML are:
- Quickly create and destroy labs and containers.
- Ensure consistency in network topology creation.
- Write your network lab as code.
Not everything is perfect, there are a couple of manual pieces that have to be done. I would say this is more a limitation at the time of writing the post.
Prepare the Project
Go and grab the code at the GitHub repo.
1git clone -b v1.0.0 --single-branch https://github.com/jillesca/network-automation.gitProject Structure
The project is divided in two main directories.
Ansible- This directory contains all files related to ansible, such as inventory, playbooks, variables, etc.
Docker- This directory has all files related to docker, such as dockerfiles, docker-compose files, environment variables.
1╰─ tree -FL 22./3├── LICENSE4├── README.md5├── ansible/6│   ├── ansible.cfg7│   ├── files/8│   ├── host_vars/9│   ├── inventory/10│   ├── playbooks/11│   └── templates/12└── docker/13    ├── ansible.docker-compose.yml14    ├── cml.docker-compose.yml15    └── image/16
178 directories, 5 files
Ansible image
Now is time to work with Ansible in docker, there are two options:
- You can build your own docker image.
- Or you can reuse the image I’ve created.
The main consideration is the version of CML you are using.
For this post, CML was running virl 2.2.2+build52. If your CML is running the same version, you can skip the building part.
If you don’t know the virl version of your CML, you can do from your terminal.
1curl https://{CML_IP}/api/v0/system_information -kFor example:
1╰─ curl https://10.10.20.161/api/v0/system_information -k2{3 "version": "2.2.2+build52",4 "ready": true5}%Build the Ansible container
Follow this section if you want to build your own image, otherwise you can use the image built from Docker Hub.
We start by reusing the Ansible image built in the previous post. This image will serve as base to add the additional libraries needed to manage CML.
To manage CML on Ansible, we use cisco.cml collection. which is available from Galaxy Collection. This library uses virl2-client under the hood.
If you want to know the details of this collection, check out the project in Github.
On the dockerfile we defined what is commented above; the image to use and which libraries to installed on pip and Ansible.
1FROM jillesca/ansible:version1.1 as cml2RUN pip install virl2-client==2.2.1.post2 \3 && ansible-galaxy collection install cisco.cmlSee virl2-client depends on the CML for more details.
To build the docker container use the command below from the root directory of the project. Otherwise adjust the path of the dockerfile.
1docker build --target cml --file docker/image/ansible.dockerfile .Add your environment variables
The project uses environment variables. This is a good way to manage secrets or special values you don’t want to store in git.
The collection cisco.cml, requires some variables. We use env vars to define these values so your credentials are out of the repo.
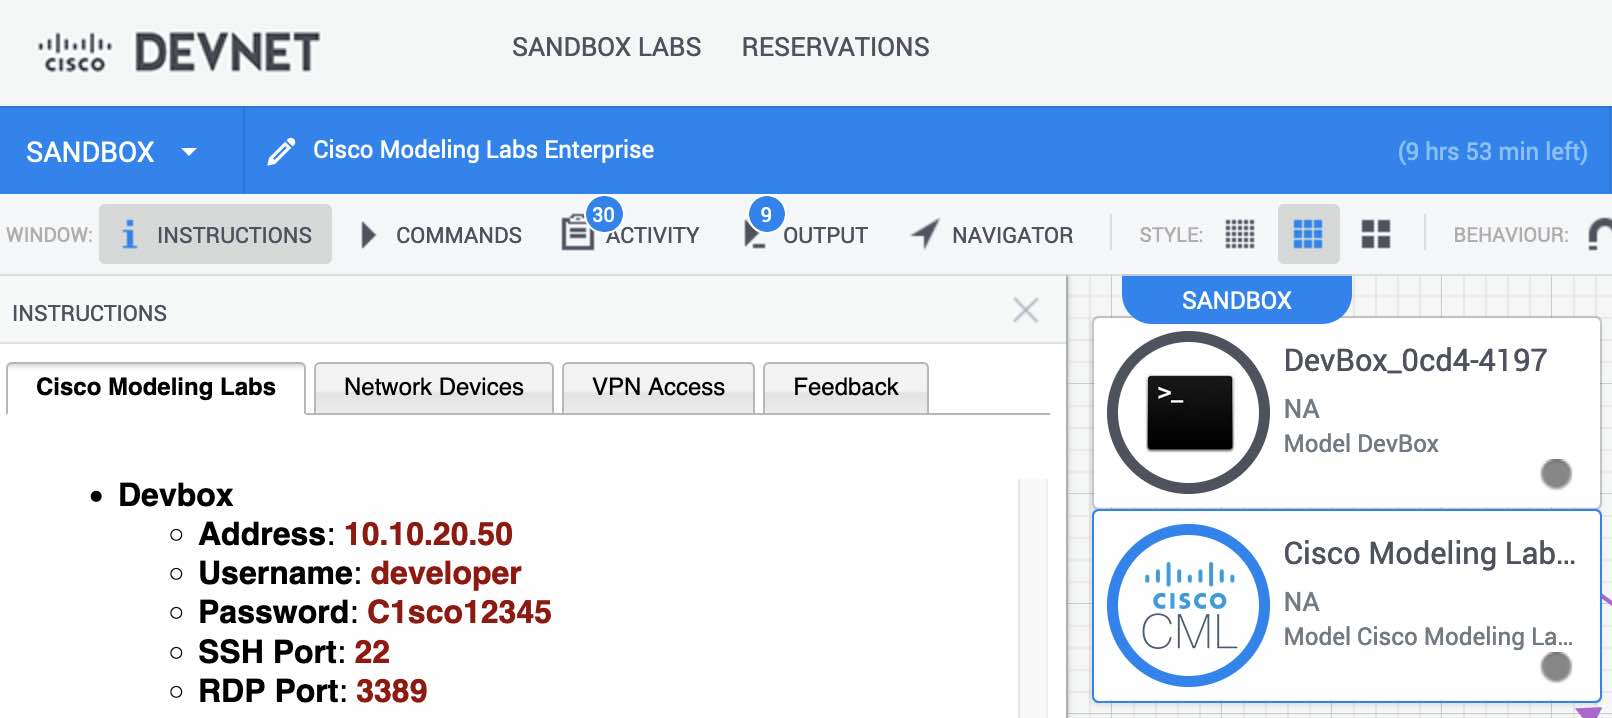
The default values from the sandbox (except the lab name) are used:
1CML_USERNAME=developer2CML_PASSWORD=C1sco123453CML_HOST=10.10.20.1614CML_LAB="ansible_base_lab"5CML_VERIFY_CERT=falseIn my case, the .env file is under the docker directory in the root project. Keep in mind the location where you place this file.
1╰─ ls -lsa docker2total 2430 drwxr-xr-x 6 jillesca staff 192 Dec 4 11:17 .40 drwxr-xr-x 10 jillesca staff 320 Dec 1 12:59 ..58 -rw-r--r-- 1 jillesca staff 117 Nov 1 15:43 .env68 -rw-r--r-- 1 jillesca staff 851 Dec 4 13:37 ansible.docker-compose.yml78 -rw-r--r-- 1 jillesca staff 420 Dec 4 13:43 cml.docker-compose.yml80 drwxr-xr-x 4 jillesca staff 128 Dec 4 11:54 imageStart the container
To work locally with the container, docker compose is used. Below you can see the definition.
1╰─ cat docker/cml.docker-compose.yml2version: "3.8"3
4services:5  cml:6    image: jillesca/ansible:cml1.17    container_name: cml8    tty: true9    volumes:10      - ./../ansible:/home11    environment:12      CML_USERNAME: ${CML_USERNAME}13      CML_PASSWORD: ${CML_PASSWORD}14      CML_HOST: ${CML_HOST}15      CML_LAB: ${CML_LAB}16      CML_VERIFY_CERT: ${CML_VERIFY_CERT}
From the compose file, two sections are important:
volumes:- We say to docker, “copy everything that is under the
ansibledir all the time. - This allows to do changes on the code locally, and these changes will be replicated automatically on the container.
- We say to docker, “copy everything that is under the
environment:- This section injects the variables from the
.envfile to the container.
- This section injects the variables from the
Run the container from root directory:
1docker-compose -f ./docker/cml.docker-compose.yml up -d1╰─ docker-compose -f ./docker/cml.docker-compose.yml up -d2
3[+] Running 1/14 ⠿ Container cml Started 0.4s5
6╰─ docker ps7CONTAINER ID IMAGE COMMAND CREATED STATUS PORTS NAMES85af70918f7b8 jillesca/ansible:cml1.1 "python3" 3 seconds ago Up 2 seconds cmlNow you can connect to the container shell by using docker exec -it cml /bin/sh. If you use vscode, there are also extensions that will help you with some clicks:
1╰─ docker exec -it cml /bin/sh2/home # ls3ansible.cfg files host_vars inventory playbooks templates4/home #Verification of env vars
This is a good moment to verify your env vars are present on the container, otherwise the lab will fail. From inside the container do env | grep -i cml:
1/home # env | grep -i cml2CML_USERNAME=developer3CML_PASSWORD=C1sco123454CML_HOST=10.10.20.1615CML_VERIFY_CERT=false6CML_LAB=ansible_base_lab7/home #Prepare the Bastion/Jump Host
For this lab I used a Jump Host as the connectivity between the network devices created in CML and the ansible container was not reliable. Even though IP connectivity was there, from time to time I had timeouts, so the best solution was to use a VM the sandbox provides.
All these steps are done from inside the container -> docker exec -it cml /bin/sh
Create the ssh keys.
1ssh-keygen -f /home/.ssh/cml -t ed25519 -C 'CML_Automation_key' -N ''Create an authorized_keys file with the public ssh key created.
1cp /home/.ssh/cml.pub /home/.ssh/authorized_keysCopy the keys to the sandbox VM. This is the VM that will work as bastion/jump host. At the time of writing the VM on the Cisco sandbox uses the IP 10.10.20.50. Replace this IP with the address of the host you want to use as bastion.
Enter the password when prompted. At the time of writing the password was C1sco12345
1scp /home/.ssh/authorized_keys developer@10.10.20.50:/home/developer/.sshExecute your ssh agent.
1eval $(ssh-agent -s)Add your keys to your agent
1ssh-add /home/.ssh/cmlTest ssh is using your keys. The bastion/jump host should not ask for your password.
Below you can see an output of this process.
1/home # ssh-keygen -f /home/.ssh/cml -t ed25519 -C 'CML_Automation_key' -N ''2Generating public/private ed25519 key pair.3Your identification has been saved in /home/.ssh/cml4Your public key has been saved in /home/.ssh/cml.pub5The key fingerprint is:6SHA256:4z4psi8nJ0hqnwXd05R5DuVeqPUcCu7YCpZnjUHjgwQ CML_Automation_key7The key's randomart image is:8+--[ED25519 256]--+9| E . |10| . = . |11| . o * = o |12| o = = O = . |13| . o *S+ + o |14| . . ..X. |15| o . = =.= |16|... O B.+ |17|. .o.X.o.. |18+----[SHA256]-----+19/home # cp /home/.ssh/cml.pub /home/.ssh/authorized_keys20/home # scp /home/.ssh/authorized_keys developer@10.10.20.50:/home/developer/.ssh21The authenticity of host '10.10.20.50 (10.10.20.50)' can't be established.22ED25519 key fingerprint is SHA256:MbXlsdtKy1J+Tj67hyVRPz5URQS/6eT2ILljoG1ihqA.23This key is not known by any other names24Are you sure you want to continue connecting (yes/no/[fingerprint])? yes25Warning: Permanently added '10.10.20.50' (ED25519) to the list of known hosts.26developer@10.10.20.50's password:27authorized_keys 100% 100 0.5KB/s 00:0028/home # eval $(ssh-agent -s)29Agent pid 8530/home # ssh-add /home/.ssh/cml31Identity added: /home/.ssh/cml (CML_Automation_key)32/home # ssh developer@10.10.20.5033(py3venv) [developer@devbox ~]$Create the lab
All these steps are done from inside the container.
With all pre-requisites done, is time to fire up the lab. To create the lab on CML, simply do:
1ansible-playbook cisco.cml.build -e startup='host'Below you can see the full output of the lab creation.
1/home # ansible-playbook cisco.cml.build -e startup='host'2SSL Verification disabled3[WARNING]: running playbook inside collection cisco.cml4
5PLAY [Build the topology] ***************************************************************6
7TASK [Check for the lab file] ***********************************************************8ok: [localhost]9
10TASK [assert] ***************************************************************************11ok: [localhost] => {12 "changed": false,13 "msg": "All assertions passed"14}15
16TASK [Create the lab] *******************************************************************17[WARNING]: Both option username and its alias user are set.18changed: [localhost]19
20TASK [Check to see if the Lab is there] *************************************************21skipping: [localhost]22
23TASK [Refresh Inventory] ****************************************************************24SSL Verification disabled25
26PLAY [Start Individual Nodes] ***********************************************************27
28TASK [Check for the cml_config_file] ****************************************************29skipping: [bridge-to-sandbox]30skipping: [sandbox-backend]31ok: [spine2-20.12 -> localhost]32ok: [leaf1-20.21 -> localhost]33ok: [leaf3-20.23 -> localhost]34ok: [spine1-20.11 -> localhost]35ok: [leaf2-20.22 -> localhost]36ok: [host2-20.32 -> localhost]37ok: [host1-20.31 -> localhost]38ok: [host3-20.33 -> localhost]39
40TASK [Read in cml_config_file] **********************************************************41skipping: [bridge-to-sandbox]42skipping: [sandbox-backend]43ok: [spine1-20.11]44ok: [spine2-20.12]45ok: [leaf1-20.21]46ok: [leaf2-20.22]47ok: [leaf3-20.23]48ok: [host1-20.31]49ok: [host2-20.32]50ok: [host3-20.33]51
52TASK [Start Individual Nodes] ***********************************************************53changed: [sandbox-backend -> localhost]54changed: [bridge-to-sandbox -> localhost]55changed: [leaf1-20.21 -> localhost]56changed: [spine1-20.11 -> localhost]57changed: [spine2-20.12 -> localhost]58changed: [leaf2-20.22 -> localhost]59changed: [host2-20.32 -> localhost]60changed: [host1-20.31 -> localhost]61changed: [leaf3-20.23 -> localhost]62changed: [host3-20.33 -> localhost]63
64PLAY [Wait for Topology to BOOT] ********************************************************65
66TASK [Check to see if all hosts are BOOTED] *********************************************67skipping: [localhost]68
69PLAY RECAP ******************************************************************************70bridge-to-sandbox : ok=1 changed=1 unreachable=0 failed=0 skipped=2 rescued=0 ignored=071host1-20.31 : ok=3 changed=1 unreachable=0 failed=0 skipped=0 rescued=0 ignored=072host2-20.32 : ok=3 changed=1 unreachable=0 failed=0 skipped=0 rescued=0 ignored=073host3-20.33 : ok=3 changed=1 unreachable=0 failed=0 skipped=0 rescued=0 ignored=074leaf1-20.21 : ok=3 changed=1 unreachable=0 failed=0 skipped=0 rescued=0 ignored=075leaf2-20.22 : ok=3 changed=1 unreachable=0 failed=0 skipped=0 rescued=0 ignored=076leaf3-20.23 : ok=3 changed=1 unreachable=0 failed=0 skipped=0 rescued=0 ignored=077localhost : ok=3 changed=1 unreachable=0 failed=0 skipped=2 rescued=0 ignored=078sandbox-backend : ok=1 changed=1 unreachable=0 failed=0 skipped=2 rescued=0 ignored=079spine1-20.11 : ok=3 changed=1 unreachable=0 failed=0 skipped=0 rescued=0 ignored=080spine2-20.12 : ok=3 changed=1 unreachable=0 failed=0 skipped=0 rescued=0 ignored=081
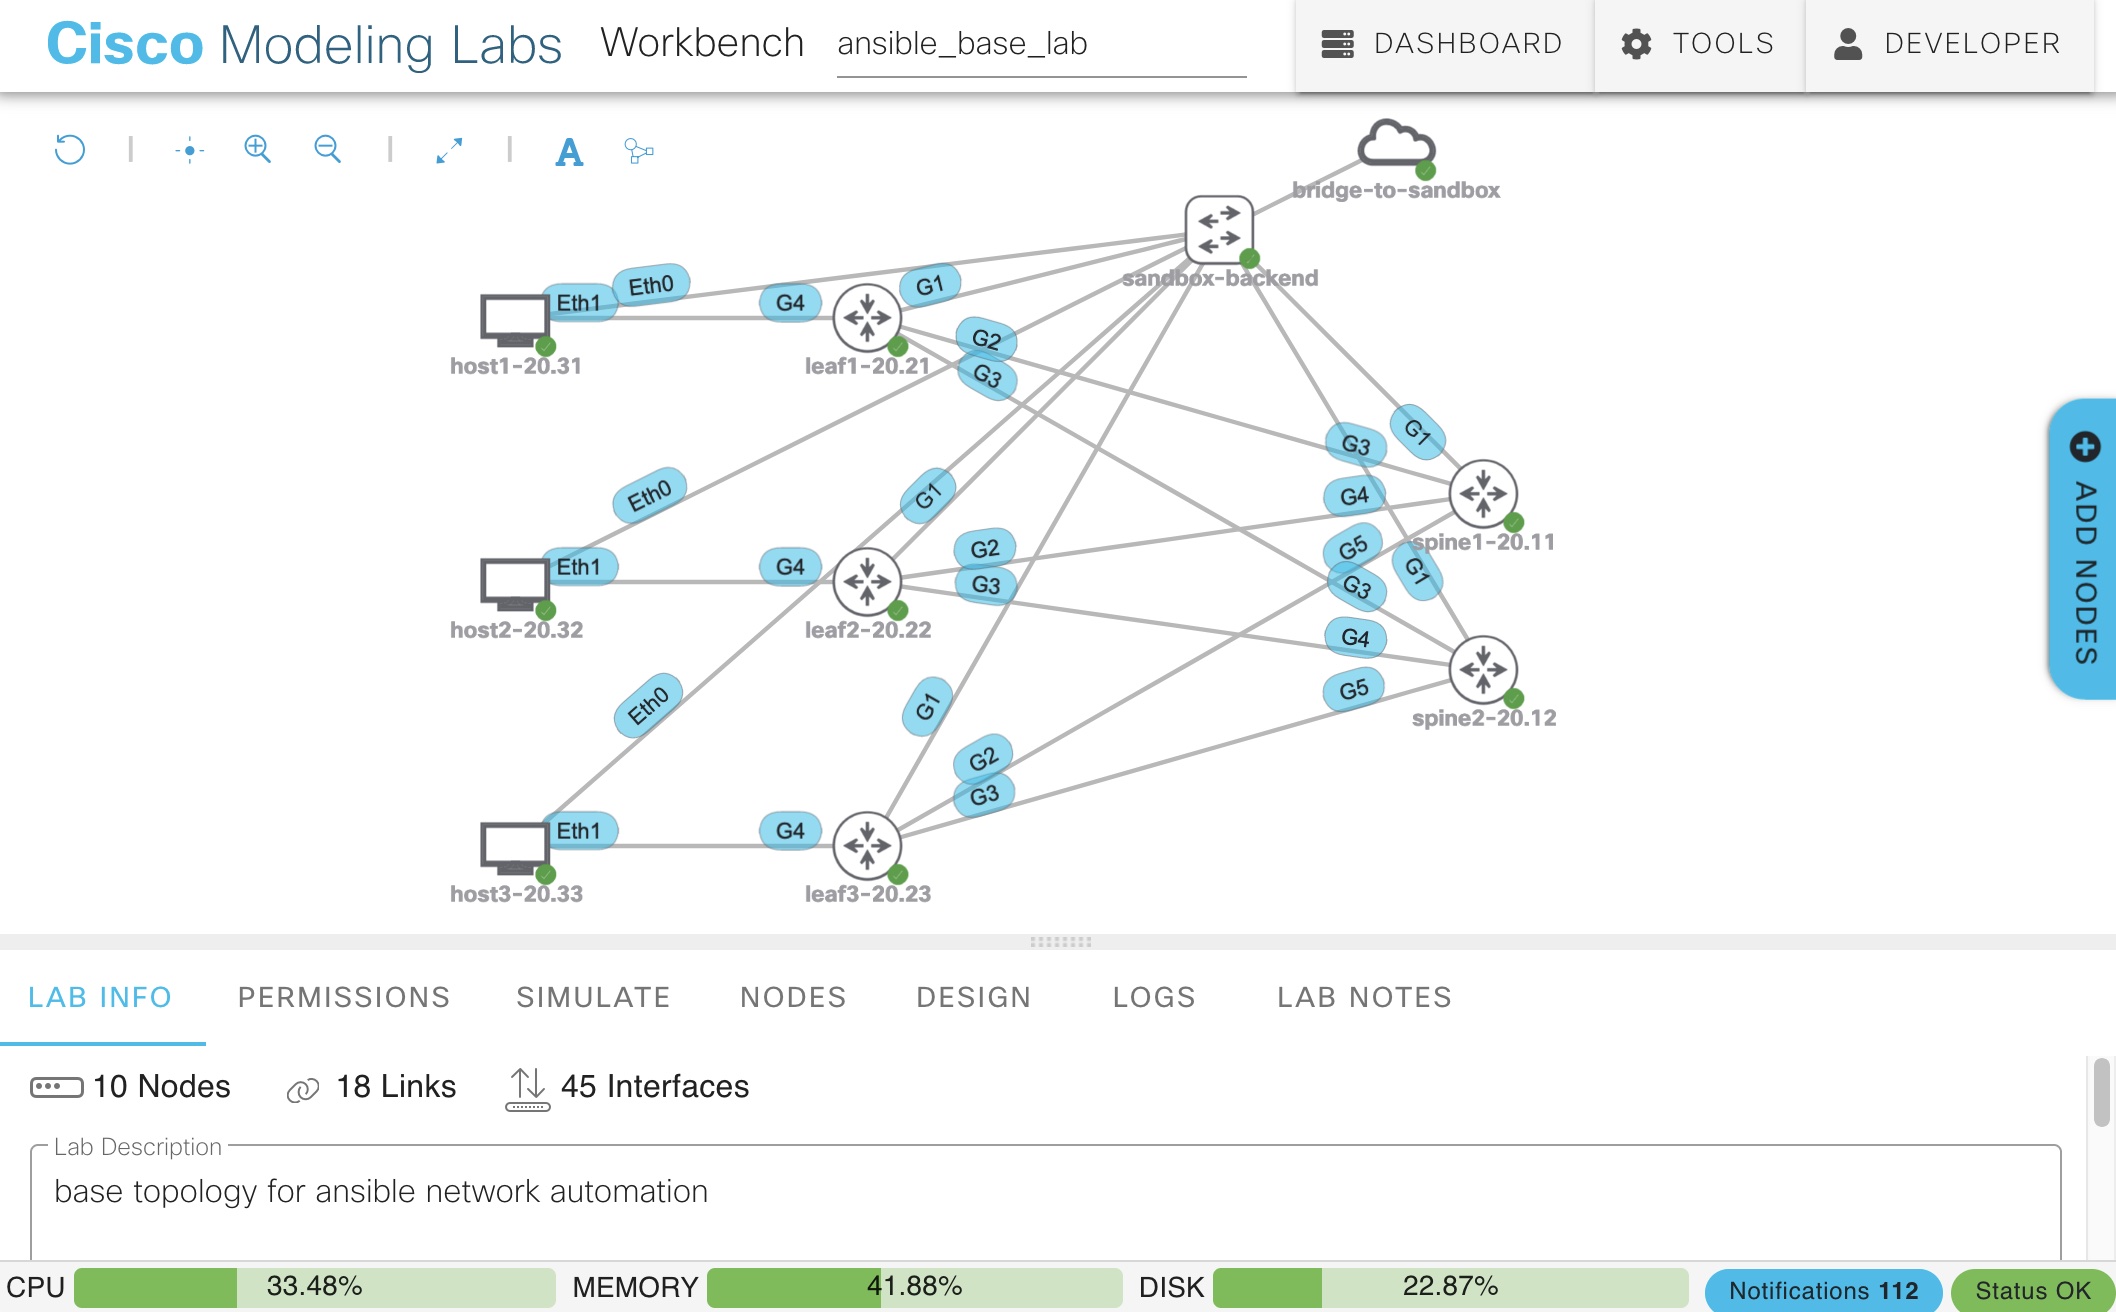
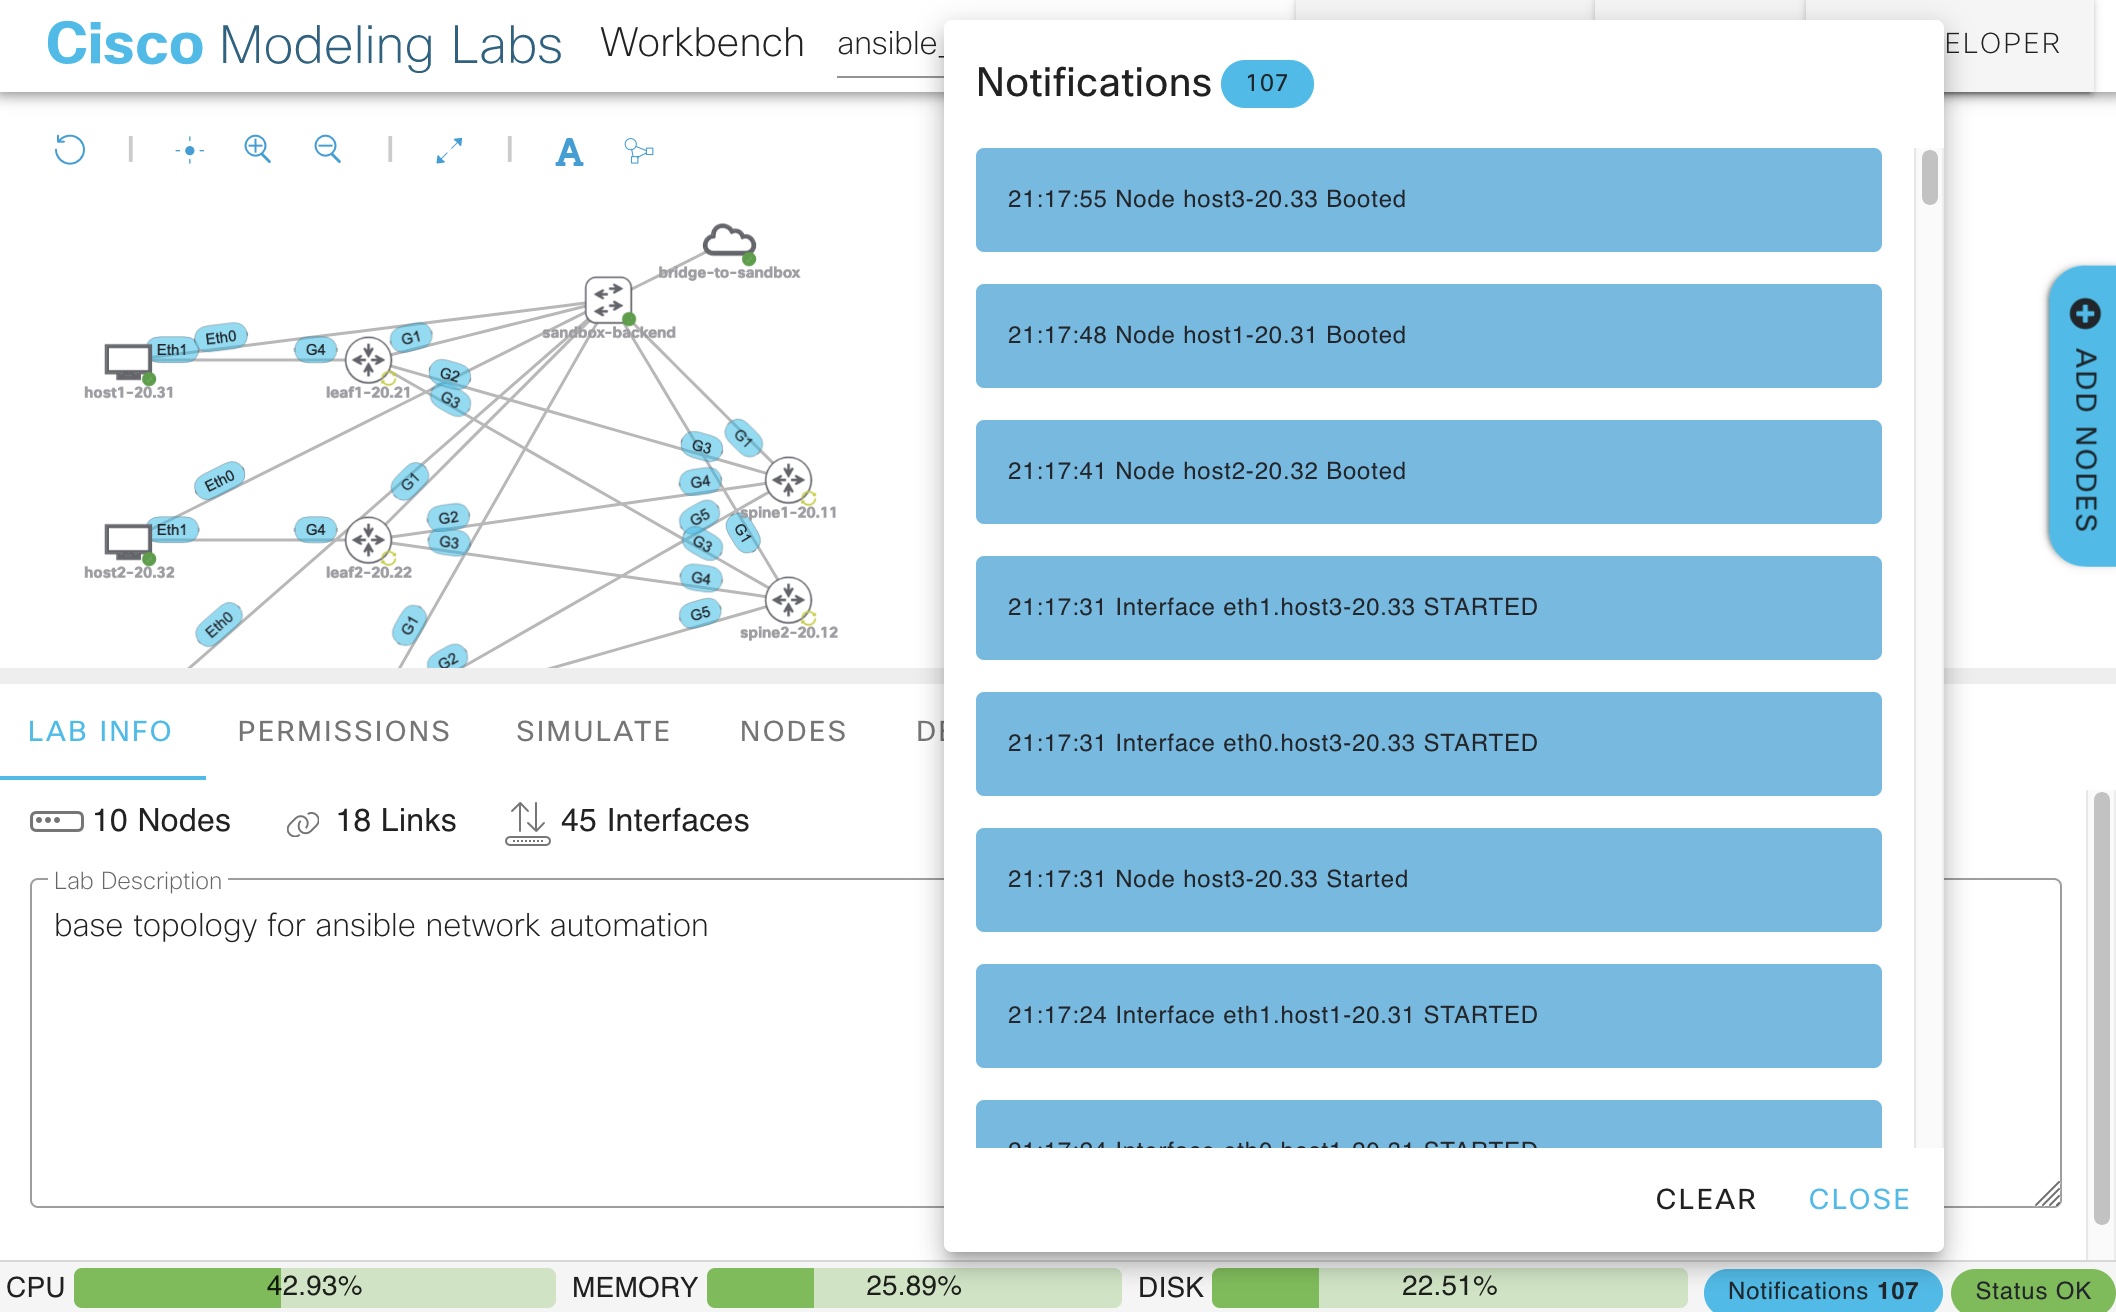
82/home #From CML you can watch the progress of the lab created.
If you examine the devices in the lab, you will see all the devices are running with their day-0 config. In our case, this day-0 config, is for the management of the device.
How the lab works?
If you are like me, you may wondering how the devices got their configs and how are the moving pieces inside Ansible. I consider this was the most difficult part for me to get my head around when starting with Ansible.
Ansible Inventory
The Ansible inventory is divided in three main components. Here is how the inventory looks like.
cml.yml
Defines the plugin and tags CML will use.
1plugin: cisco.cml.cml_inventory2group_tags: clients, networknetwork.yml
Defines the network devices. Two main groups are defined network and iosxe_routers
1all:2 children:3 network:4 children:5 iosxe_routers:6 hosts:7 spine1-20.11:8 ansible_host: 10.10.20.119 spine2-20.12:10 ansible_host: 10.10.20.1211 leaf1-20.21:12 ansible_host: 10.10.20.2113 leaf2-20.22:14 ansible_host: 10.10.20.2215 leaf3-20.23:16 ansible_host: 10.10.20.23system.yml
Defines the clients. Two main groups are defined clients and linux_hosts
1all:2 children:3 clients:4 children:5 linux_hosts:6 hosts:7 host1-20.31:8 ansible_host: 10.10.20.319 host2-20.32:10 ansible_host: 10.10.20.3211 host3-20.33:12 ansible_host: 10.10.20.33Variable parsing in Ansible
Remember the lab structure presented before, now is time to see the Ansible part. Let’s see the relevant parts from another perspective.
When you execute ansible-playbook cisco.cml.build -e startup='host' the following happens:

- /inventory/group_vars/all/all.yml is parsed:
- Global variables are set, like ansible credentials, GW.
- ssh config for bastion is defined here.
- *.yml files under
/inventoryare parsed (this is not default behaviour, see the fileansible.cfgon the repo). - /inventory/cml.yml
- Gets variables from
/hosts_vars/cml.yml- The env vars for cml are parsed.
- Gets variable defined from
/inventory/group_vars/all/cml.ymlcml_lab_filetellscisco.cmlwhich file is use to create the topology in CML.- If you want to use your own lab, this is the file you need to point to.
- The hosts defined on
network.ymlandsystem.ymlmatch the hosts on this file.
- Gets variables from
- network.yml
- Gets variables from
/inventory/group_vars/iosxe_routers/iosxe_routers.ymlmgmt_interfacesets which interface will be used for managment.cml_config_filetellscisco.cmlwhich file will be used asday-0config.- This points to
ansible/templates/iosxe/bootstrap.j2 - The
day-0config is in jinja and takes several variables.
- This points to
- Gets variables from
- system.yml
- Gets variables from
/inventory/group_vars/linux_hosts/linux_hosts.ymlcml_config_filetellscisco.cmlwhich file will be used asday-0config.- This points to
/templates/linux_hosts/bootstrap.j2 - The
day-0config is in jinja and takes several variables.
- This points to
- Gets variables from
I would say this is the messy part, which at the beginning could be complex, but once you understand the flow it, becomes easier.
Once all variables are parsed and ready, cisco.cml proceeds to build the lab with its playbook cisco.cml.build.
Test the lab
For testing the lab we just created, we will be using cisco.ios.ios_facts The playbook below will print all facts gathered by this collection.
The goal is to be able to connect to the devices created with Ansible. And on this post, that will be through the Bastion/Jump host.
1- name: Show cisco facts2  hosts: network3  connection: ansible.builtin.network_cli4  gather_facts: no5
6  tasks:7    - name: Gather cisco facts8      cisco.ios.ios_facts:9        gather_subset: all10
11    - name: Print cisco facts12      ansible.builtin.debug:13        var: ansible_facts
To run the playbook, simply do:
1ansible-playbook playbooks/test_lab.ymlFor example:
1/home # ansible-playbook playbooks/test_lab.yml2SSL Verification disabled3
4PLAY [Show cisco facts] *****************************************************************5
6TASK [Gather cisco facts] ***************************************************************7ok: [spine1-20.11]8ok: [spine2-20.12]9ok: [leaf3-20.23]10ok: [leaf2-20.22]11ok: [leaf1-20.21]12
13TASK [Print cisco facts] ****************************************************************14ok: [leaf1-20.21] => {15
16. . . . .17
18ok: [spine1-20.11] => {19    "ansible_facts": {20        "net_all_ipv4_addresses": [21            "10.10.20.11"22        ],23        "net_all_ipv6_addresses": [],24        "net_api": "cliconf",25        "net_config": "Building configuration......."26        "net_filesystems": [27            "bootflash:"28        ],29        "net_filesystems_info": {30            "bootflash:": {31                "spacefree_kb": 5308528.0,32                "spacetotal_kb": 6139200.033            }34        },35        "net_gather_network_resources": [],36        "net_gather_subset": [37            "interfaces",38            "config",39            "hardware",40            "default"41        ],42        "net_hostname": "spine1-20.11",43        "net_image": "bootflash:packages.conf",44        "net_iostype": "IOS-XE",45        "net_memfree_mb": 858103.16015625,46        "net_memtotal_mb": 1105215.80859375,47        "net_model": "CSR1000V",48        "net_neighbors": {},49        "net_python_version": "3.11.0",50        "net_serialnum": "9TZF7KV77J9",51        "net_system": "ios",52        "net_version": "17.03.02",53        "network_resources": {}54    }55}56
57PLAY RECAP ******************************************************************************58leaf1-20.21                : ok=2    changed=0    unreachable=0    failed=0    skipped=0    rescued=0    ignored=059leaf2-20.22                : ok=2    changed=0    unreachable=0    failed=0    skipped=0    rescued=0    ignored=060leaf3-20.23                : ok=2    changed=0    unreachable=0    failed=0    skipped=0    rescued=0    ignored=061spine1-20.11               : ok=2    changed=0    unreachable=0    failed=0    skipped=0    rescued=0    ignored=062spine2-20.12               : ok=2    changed=0    unreachable=0    failed=0    skipped=0    rescued=0    ignored=063
64/home #Delete the lab
To delete the lab on CML, use the playbook cisco.cml.clean, which uses the lab name defined from the env var:
1ansible-playbook cisco.cml.cleanFor example:
1/home # ansible-playbook cisco.cml.clean2SSL Verification disabled3
4PLAY [localhost] ************************************************************************5
6TASK [Stop the lab] *********************************************************************7[WARNING]: Both option username and its alias user are set.8changed: [localhost]9
10TASK [Wipe the lab] *********************************************************************11changed: [localhost]12
13TASK [Erase the lab] ********************************************************************14changed: [localhost]15
16PLAY RECAP ******************************************************************************17localhost                  : ok=3    changed=3    unreachable=0    failed=0    skipped=0    rescued=0    ignored=018
19/home #
If you want to specify a lab to delete, use -e cml_lab=LAB_NAME. And if you have spaces in your lab name use double quotations, for example: ' inside ""
1ansible-playbook cisco.cml.clean -e cml_lab="'Small NXOS/IOSXE Network'"From CML you can watch the progress of the lab deleted.
There are more options on the playbook cisco.cml.clean take a look
How can I add my own lab?
If you follow the structure layout in the project, the best way to create your own lab is the following:
- Create a baseline topology:
- Create a lab in CML by hand or use one of their examples.
- Export the lab from CML in
yamlformat.- In the GUI; Bottom bar > Simulate > Download Lab
- If you want to manage day-0 config, remove any configuration for the devices.
- Add the extension
.j2to the yaml file to make it a jinja file and place it at/files/topologies/base-setup/. For example. - You could have many labs stored there, but the lab that is picked up, is controlled by the variable cml_lab_file.
- Don’t forget to adjust the Ansible inventory based on the hosts you added on the CML file.
- Day-0 config
- Day-0 config is managed based on the host group.
- the variable
cml_config_filetells CML which file has the day-0 config for a device. - Place you day-0 config on the file you defined in
cml_config_file. This file has to a jinja file.
If you follow these considerations, you should be able to add as many labs as you want.
If you want to create several labs, remember to update the corresponde variables.
Conclusion
This post took way longer that I expected when I had the idea. What I thought it could be short article, became way larger than what I was thinking.
But when trying to figure out, how to automate a lab in CML with Ansible, not many resources when into the detail about how it works, just assumed you already knew, that’s why I wanted to add relevant details and try to be clear.
Additionally, once the lab process is automated, you don’t need to repeat all the steps here, eventually becomes an easy process. But when there is an issue, you will be happy there is a detailed article explaining how it works and how you can use it.
Credits
I can’t take credit for the Ansible structure of the project and how it works. When learning about cisco.cml, I found this awesome organization model-driven-devops. which is part of the book Model-Driven DevOps.
Take a look at the GitHub organization and book to learn more about how to manage networks using single source of truth and more interesting for me, working with structured data.